Authentication
All endpoints in the Sales Channel Services API require authentication. If omitted, the API will reject the request and instead return an HTTP 401 Unauthorized response.
We offer two methods for the user to provide authentication in the request:
- Using OAuth2 access tokens acquired through Azure AD B2C.
- Using API keys acquired through the API.
The OAuth2-based authentication method is the most secure and is recommended for to be used by humans, as it will yield short-lived access tokens, thus lowering the risk of accidentally leaking them.
The API keys are primarily for machine-to-machine use-cases, where one application will need to have access to the API for a prolonged time without the possibility for letting a human complete the OAuth2 authentication challenge.
After successfully authenticating using either of these methods, the request will inherit all the rights the user has for the remainder of the request. Read the page on Authorization for more details.
OAuth2 (Azure AD B2C)
When authenticating against the API, you will use the OAuth2-based authentication method. You can use an existing identity provider, e.g. your Microsoft account, to prove that you own the email address for your user.
Identity management is performed by Azure AD B2C, which will give you an access token to be used to authenticate your requests against the Sales Channel Services API.
Obtaining an access token
We recommend all the users of this authentication mechanism to use the OpenAPI UI we provide to obtain access tokens for the Azure AD B2C authentication mechanism. Technical documentation on how to obtain an access token through other means is provided by Azure in their AD B2C documentation.
One important advantage of using the OpenAPI UI is that it will be pre-configured to complete the challenge for the specific environment you are working with, which should make it low-friction to get started with.
To authenticate an access token for your current window of the OpenAPI UI, follow these steps:
- First, click the "Authorize"-button.

- Then click again "Authorize" for the
AzureAdB2Cauthentication option. Leave the required scopes selected.
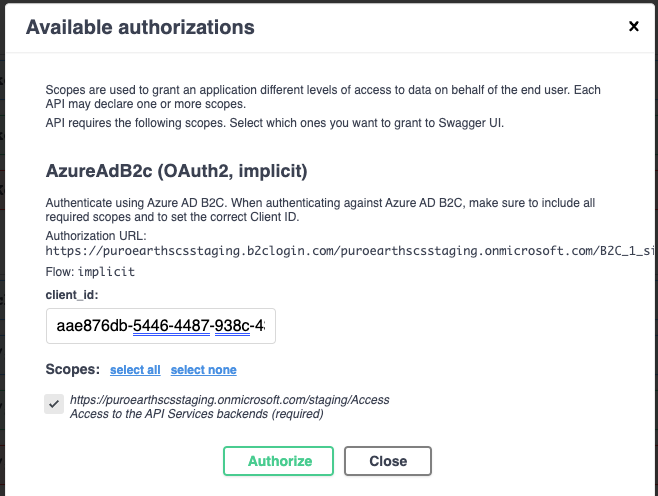
- Follow the on-screen instructions to login.
- Now you should be authenticated in the OpenAPI UI, which you can use to interact with the API.
When the access token expires, subsequent requests will fail with an HTTP 401 Unauthorized response. Again, go through the steps, but first press "Logout" at step 2.
Authenticating with an access token
The access tokens obtained from Azure AD B2C are passed in through the Authorization header as part of the HTTP request. The value of that header should be in the form Bearer YOUR-ACCESS-TOKEN.
The following snippets outline how such request could look like:
curl -X 'GET' \
  'https://scs.api.puro.earth/user-services/users/me/saleschannel-binding' \
  -H 'accept: application/json' \
  -H 'Authorization: Bearer eyJ0eX...vqL5QA'
API Keys
For long-lived sessions between machine-to-machine purposes, it is possible to authenticate using API keys. The API keys can be obtained and managed through the API. You will find all the available endpoints under the Authentication-tag.
API keys will automatically get an expiration date, currently configured to be one year after creation. Therefore, you will have to implement a process of rotating the API keys in your application.
Obtaining an API key
You can create a new API key by making a request against POST /authentication/users/me/api-keys. To make this initial request, use either an existing API key or a different authentication method.
The response of the API key creation request is shown below. This response contains the ID and secret passphrase of the API key. You will have to store both. Take extra care to protect the secret passphrase, as it is confidential information which can compromise your account.
| id required | string non-empty The ID of the API key. |
| createdOn required | string <date-time> The date on which the API key was created |
| expiresAt required | string <date-time> The date on when this API key will expire |
| passphrase required | string non-empty The passphrase of the API key. |
{- "id": "cl0s639m50000q6xd99vv2gqs",
- "createdOn": "2000-01-01T00:00:00.000Z",
- "expiresAt": "2000-01-01T00:00:00.000Z",
- "passphrase": "aad75005-ed0e-4a29-934a-9cd99bccf7bc"
}Use the DELETE /authentication/api-keys/{apiKeyId}-endpoint to remove keys you do not intend to use anymore, for example after rotating the API keys you are using in production.
Authenticating with an API key
After obtaining an API key, you can use the ID-passphrase pair as you would use the HTTP "Basic" authentication credentials, as defined in RFC7617.
The following snippets outlines how such request could look like:
curl -X 'GET' \
  'https://scs.api.puro.earth/user-services/users/me/saleschannel-binding' \
  -H 'accept: application/json' \
  -H 'Authorization: Basic Y2xieHluaWxyMDAwMGVveGQzY2o0Y3gzdjozYjg4MWJiOC0zYjk0LTQ5N2YtYjFkNS00NzEzZTRhZmRhMzU='